Battery switch on travel trailer function is crucial for managing your RV’s power. Understanding how your battery switch works is key to preventing dead batteries and maximizing your off-grid adventures. This guide breaks down the different types of switches, how to connect and disconnect batteries safely, and how to troubleshoot common problems. We’ll cover everything from simple single-switch setups to more complex systems involving solar panels and inverters, ensuring you’re confident in managing your travel trailer’s power.
Whether you’re a seasoned RVer or a newbie just starting out, knowing how to properly use and maintain your battery switch is essential for a smooth and enjoyable camping experience. This guide will walk you through the process step-by-step, providing clear explanations and practical tips to keep your power flowing.
Battery Switch Types in Travel Trailers
Choosing the right battery switch for your travel trailer is crucial for managing your power sources effectively and preventing accidental drain. Different switches offer varying levels of control and complexity, each with its own set of advantages and disadvantages. Understanding these differences will help you select the best option for your needs.
Single Battery Switch Operation
A single battery switch is the simplest type. It’s essentially an on/off switch that connects or disconnects your trailer’s house battery from the rest of the electrical system. When the switch is “on,” the battery powers the trailer’s lights, appliances, and other 12-volt devices. When “off,” it isolates the battery, preventing it from draining. This is a cost-effective solution suitable for trailers with a single battery and minimal power demands.
Dual Battery Switch Operation
Dual battery switches allow you to control two batteries independently. Commonly used in trailers with both a house battery and a starting battery (for the tow vehicle), this switch provides separate on/off control for each battery. This prevents accidental draining of one battery by the other, ensuring you always have power for starting your tow vehicle even if the house battery is depleted.
Some dual switches also include a combined “both” position, allowing both batteries to power the trailer.
Multi-Stage Battery Switch Operation
More advanced systems, often incorporating a battery management system (BMS), can offer multiple stages of control. These systems might include a main switch to isolate all batteries, individual switches for each battery, and possibly automatic switching based on battery voltage. These are generally found in larger trailers or those with multiple battery banks for increased power capacity. They offer the greatest level of control and protection, preventing over-discharge and maximizing battery life.
Comparison of Battery Switch Types
| Feature | Single Switch | Dual Switch | Multi-Stage Switch |
|---|---|---|---|
| Number of Batteries Controlled | One | Two | Multiple (often 2 or more) |
| Control Levels | On/Off | On/Off per battery, sometimes combined | Multiple stages, often with automatic features |
| Cost | Low | Medium | High |
| Complexity | Low | Medium | High |
Connecting and Disconnecting Batteries
Connecting and disconnecting your travel trailer batteries requires careful attention to safety procedures to prevent sparks, short circuits, and potential injury. Always disconnect negative terminals first and reconnect them last. This minimizes the risk of accidental shorts.Properly connecting and disconnecting your batteries ensures reliable power for your appliances and prevents damage to your electrical system. Understanding the process of isolating your house and chassis batteries using the battery switch is crucial for managing power consumption and preventing unwanted battery drain.
So, you’re planning a trip? Awesome! First things first: get yourself sorted with travel insurance. Check out Aon travel insurance for comprehensive coverage. Then, if you’re an audiophile like me, don’t forget your tunes! Planning your audiophile travel setup beforehand is key for a truly enjoyable trip. Seriously, good music makes any adventure better.
Battery Connection Procedure
Before beginning any work, always ensure the battery switch is in the OFF position. This will prevent accidental short circuits. To connect the batteries, begin by firmly attaching the positive (+) cable to the positive terminal of each battery, ensuring a secure connection. Then, attach the negative (-) cable to the negative terminal of each battery. Use appropriate-sized wrench or socket to tighten the terminals.
Finally, double-check all connections for tightness and security before turning on the battery switch. If you notice any corrosion, address it before making connections.
Battery Disconnection Procedure
To disconnect the batteries, begin by turning the battery switch to the OFF position. This isolates the batteries from the electrical system. Then, carefully loosen and remove the negative (-) cable from the negative terminal of each battery, starting with the house battery if you have a dual-battery setup. Next, remove the positive (+) cable from the positive terminal of each battery.
Store the cables safely to avoid damage or accidental connection. Remember, always disconnect the negative cable first and reconnect it last.
Isolating House and Chassis Batteries
Most travel trailers use a battery switch to isolate the house battery (powering interior lights, appliances, etc.) from the chassis battery (powering things like brakes and lights). This switch typically has three positions: “Both,” “House,” and “Off.” To isolate the house battery, switch the selector to the “Off” position. This cuts power to both batteries and is important for extended storage to prevent complete battery drain.
To use only the house battery, select “House”. To use both batteries, select “Both”.
Maintaining Battery Connections and Preventing Corrosion
Regular inspection and maintenance of your battery connections are vital for preventing corrosion and ensuring reliable power. Corrosion can build up over time, leading to poor connections and reduced battery life. To prevent corrosion, apply a thin layer of anti-corrosion grease or spray to the battery terminals and cable clamps after cleaning. Clean the terminals and clamps periodically with a wire brush or battery terminal cleaner.
So, you’re planning a trip? Awesome! First things first: get yourself sorted with travel insurance. Check out Aon travel insurance for solid coverage. Then, if you’re an audiophile like me, you’ll want to check out audiophile travel setup advice before you go. Nothing ruins a trip faster than realizing your headphones don’t work, right?
Get that sorted and you’ll be good to go!
Always disconnect the batteries before cleaning. Regularly check for loose connections and tighten them as needed.
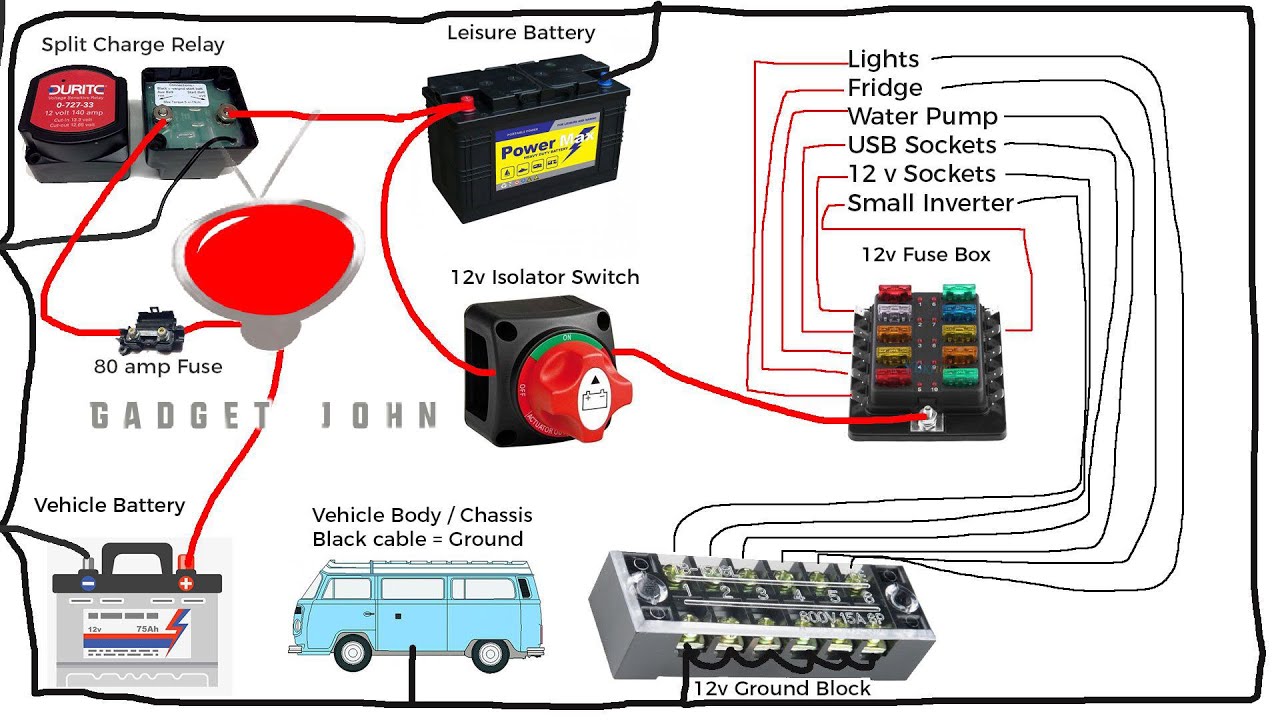
Typical Travel Trailer Battery Setup
[Descriptive Text of Visual Guide]Imagine a diagram showing two batteries (labeled “Chassis Battery” and “House Battery”) positioned near the tongue of the trailer. A thick red wire runs from the positive (+) terminal of the chassis battery to the positive side of a battery switch. A similar thick red wire runs from the positive side of the battery switch to the positive (+) terminal of the house battery.
A thick black wire runs from the negative (-) terminal of the chassis battery to the negative side of the battery switch. A similar thick black wire runs from the negative side of the battery switch to the negative (-) terminal of the house battery. The battery switch is clearly labeled with three positions: “Both,” “House,” and “Off.” All connections are secured with appropriate clamps and show a thin layer of anti-corrosion grease.
Wires are neatly routed and secured to prevent damage or short circuits. Arrows indicate the direction of current flow in each position of the battery switch.
Troubleshooting Battery Switch Issues
Your travel trailer’s battery switch is a critical component, controlling the flow of power to your appliances and systems. When it malfunctions, it can leave you stranded without lights, refrigeration, or other essential functions. Understanding common problems and troubleshooting techniques can save you time, frustration, and potentially costly repairs.
Common Battery Switch Problems
Several issues can arise with your travel trailer’s battery switch. These range from a complete lack of power to intermittent power fluctuations. Identifying the specific problem is the first step towards a solution. Understanding the symptoms will help guide you through the appropriate troubleshooting steps. Common problems include no power to the trailer, intermittent power, and blown fuses.
Troubleshooting Steps for No Power
If your trailer has absolutely no power, several checks should be performed systematically. First, verify that the battery switch itself is in the “on” position. Next, check the battery’s voltage using a multimeter. A low voltage reading indicates a dead or failing battery requiring charging or replacement. Inspect the battery cables for corrosion or loose connections; clean and tighten any connections as needed.
If the problem persists, check the fuses associated with the battery switch and replace any blown fuses. If the problem still exists after these steps, the battery switch itself may be faulty.
Troubleshooting Steps for Intermittent Power
Intermittent power usually suggests a loose connection or a failing component. Start by carefully inspecting all wiring and connections related to the battery switch. Look for corrosion, loose bolts, or damaged wires. Pay close attention to the connections at both the battery and the switch itself. A visual inspection might reveal a loose or corroded connection.
Gently wiggle the connections while checking for power fluctuations. If the problem is intermittent and only appears under certain conditions (e.g., when using high-power appliances), the issue might lie within the wiring itself or a higher-current component.
Troubleshooting Steps for Blown Fuses
Blown fuses indicate an overload in the electrical system. Before replacing a blown fuse, identify the cause of the overload. This could be a short circuit, a faulty appliance, or simply drawing too much power from the battery. Once the cause is identified and rectified, replace the blown fuse with a fuse of the correct amperage rating. Never replace a blown fuse with a higher amperage fuse; this is a fire hazard.
Replacing a Faulty Battery Switch
Replacing a battery switch is a relatively straightforward process, but requires some basic electrical knowledge and tools. First, disconnect the negative battery cable to prevent accidental shorts. Then, carefully remove the existing switch by unscrewing the mounting bolts. Note the wiring configuration before disconnecting the wires from the old switch. Install the new switch, ensuring the wires are connected in the same configuration as the old switch.
Secure the new switch with the mounting bolts, reconnect the negative battery cable, and test the switch’s functionality. Always consult the wiring diagram for your specific travel trailer model to ensure correct installation.
Troubleshooting Flowchart
This flowchart provides a visual guide to troubleshoot battery switch problems:Start -> No Power? -> Yes: Check Battery Switch Position, Battery Voltage, Battery Cables, Fuses -> No Power Still? -> Yes: Replace Battery Switch -> No: Problem Solved. -> No (Intermittent Power?): -> Yes: Check Wiring & Connections, Look for Corrosion, Test under Load -> Problem Solved? -> Yes: End -> No: Replace Battery Switch -> End
Battery Switch and Power Management Systems: Battery Switch On Travel Trailer Function
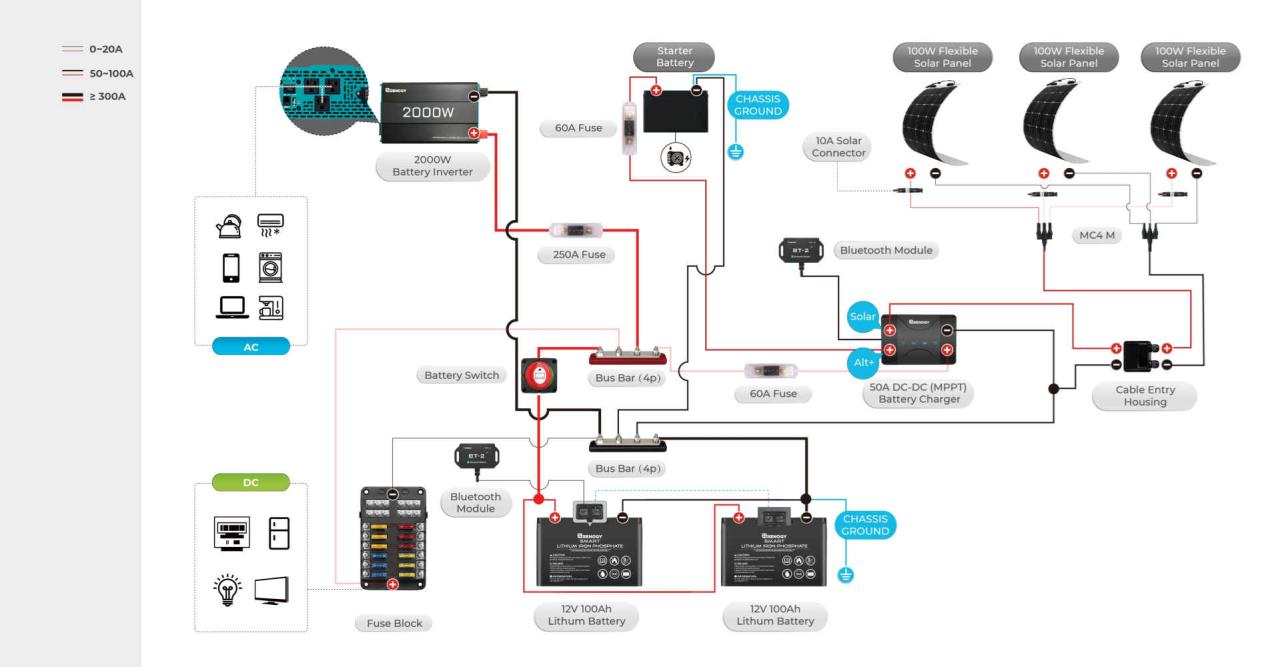
Your travel trailer’s battery switch is a crucial component, but it’s only part of a larger power management system. Understanding how it interacts with other systems like solar panels, inverters, and converters is key to maximizing your RV’s power efficiency and extending the life of your batteries. This section will detail that interaction.The battery switch acts as the central on/off control for your house batteries, influencing how power flows throughout your trailer.
Its strategic placement allows for precise control over power distribution, preventing potential overloads and maximizing the lifespan of your battery bank. Proper use significantly impacts your overall energy consumption and the health of your batteries.
Battery Switch Integration with Other Power Systems
A typical setup involves several key components interacting through the battery switch. The switch controls the flow of power from your house batteries to the rest of your RV’s electrical system. Solar panels charge the batteries, often through a charge controller that regulates the voltage and current. An inverter converts DC power from the batteries to AC power for appliances needing 120V.
A converter does the opposite, transforming 120V AC from the shore power or generator into 12V DC to charge the batteries and power some DC appliances.
Efficient Power Usage and Battery Life
The battery switch’s role in efficient power usage is significant. By disconnecting the house batteries when not needed, you prevent parasitic drain – the slow, continuous discharge of your batteries from devices that remain on even when the trailer is parked. This extends battery life and reduces the frequency of charging, saving energy and money in the long run.
For example, if you leave your trailer parked for an extended period, turning off the battery switch prevents the small drain from the RV’s clock or carbon monoxide detector from eventually depleting the batteries.
Impact on Overall Power Distribution
The battery switch acts as a gatekeeper for power distribution. When the switch is “on,” power from the batteries is available to all connected devices. When “off,” this power is completely isolated. This prevents accidental discharge and allows for more controlled power management. Consider a scenario where a faulty appliance draws excessive current.
With the switch “off,” this fault is isolated, preventing damage to the batteries and other systems.
Diagram of Battery Switch Interaction with Power Components
Imagine a simple diagram. At the center is the battery switch, represented by a simple switch symbol. On one side, we have the house batteries (two battery symbols in parallel). From the other side of the switch, several lines extend to other components: one line leads to a solar panel (represented by a sun symbol with an arrow pointing towards the battery), connected through a charge controller (represented by a small box with the letters “CC”).
Another line goes to an inverter (represented by a box labeled “INV”), which then connects to AC appliances (represented by a light bulb symbol). A third line connects to a converter (represented by a box labeled “CONV”), which receives power from the shore power connection (represented by a plug symbol) and supplies 12V DC to the trailer’s DC appliances and also charges the batteries.
All lines are connected through wires (represented by lines). This illustrates the central role of the battery switch in managing power flow from the batteries to the various systems within the trailer.
Safety Considerations with Battery Switches
Working with batteries, especially in a travel trailer, requires caution. Improper handling can lead to serious injury or damage to your equipment. Understanding the potential hazards and taking appropriate safety measures is crucial for a safe and enjoyable RV experience. This section details important safety practices to follow when working with your travel trailer’s battery system.Proper ventilation is essential when working with lead-acid batteries.
These batteries release hydrogen gas during charging and operation, which is highly flammable and explosive. Insufficient ventilation can create a dangerous buildup of this gas, leading to a potential explosion. Always work in a well-ventilated area, preferably outdoors or in a space with good airflow. Even seemingly minor sparks can ignite this gas, causing significant harm.
Battery Handling Precautions, Battery switch on travel trailer function
Lead-acid batteries contain corrosive sulfuric acid. Skin contact can cause burns, and eye contact can lead to severe damage. Always wear appropriate personal protective equipment (PPE) when handling batteries. Acid spills should be neutralized immediately with baking soda and cleaned thoroughly. Avoid touching the battery terminals or connections directly unless wearing insulated gloves.
Preventing Short Circuits and Electrical Shocks
Accidental short circuits can cause sparks, fires, and damage to electrical components. Before working on the battery system, ensure the battery switch is turned off. Always disconnect the negative (-) terminal first to prevent accidental shorting. When reconnecting, connect the positive (+) terminal last. Keep tools and metal objects away from the battery terminals to prevent accidental contact.
Never work on the battery system while it’s raining or in damp conditions. Moisture can increase the risk of electrical shocks.
Recommended Safety Equipment
It’s vital to have the right equipment on hand before beginning any work on your travel trailer’s battery system. The following items are essential for safe battery handling:
- Insulated gloves: Protect your hands from electrical shocks and acid burns.
- Safety glasses or goggles: Shield your eyes from acid splashes and sparks.
- Baking soda: Neutralizes spilled battery acid.
- Ventilation: Ensure a well-ventilated area to prevent hydrogen gas buildup.
- Non-conductive tools: Avoid using metal tools near battery terminals; use plastic or insulated tools.
- Flashlight: Provides illumination without creating sparks.
Mastering your travel trailer’s battery switch unlocks a world of off-grid freedom. By understanding the different types of switches, safe connection procedures, and common troubleshooting steps, you’ll be well-equipped to handle any power situation. Remember, safety is paramount; always prioritize proper ventilation and disconnect power before working on your battery system. With a little knowledge and these tips, you can confidently manage your travel trailer’s power and enjoy worry-free adventures.
FAQ Corner
What happens if my battery switch is left in the “off” position?
Leaving the switch off completely disconnects the house batteries from the charging system and any other power sources, preventing them from being charged. This will lead to a dead battery if you’re not using shore power or a generator.
Can I use a battery switch to start my truck from my travel trailer batteries?
Generally, no. Travel trailer batteries are typically deep-cycle batteries designed for sustained discharge, not the high-current demands of starting a vehicle. Attempting this could damage the batteries.
How often should I clean my battery terminals?
Clean your battery terminals at least once a year, or more often if you notice corrosion. Corrosion can impede current flow and lead to battery problems.
What size fuses should I use with my battery switch?
The correct fuse size depends on the amperage rating of your battery switch and wiring. Consult your switch’s documentation for the recommended fuse size. Never use a fuse with a higher amperage rating than specified.
